
Not Happy With the Shine of Your Diamond Painting? Read This First
Before you decide to give up, here are the small details that could make a big difference
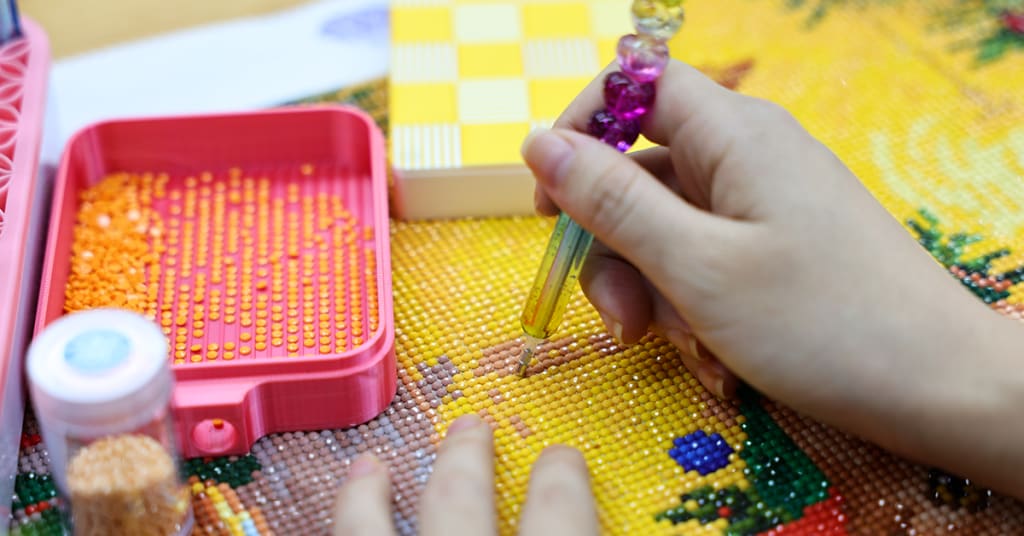
If you’re new to diamond painting, your first finished piece may not look as shiny as you imagined.
You sit there for hours, placing each drill one by one. You try to be careful with every step. In your mind, the final result should look bright and full of sparkle. But when you take a step back, it may look a bit flat. It may not have that strong shine you expected.
At that moment, it’s easy to feel a little disappointed. You might start to question the product itself. You might even think the photos online were misleading. For some people, this is enough to make them stop. They decide not to buy another kit or try again.
This is usually the point where people hesitate. You are not sure if it’s worth continuing.
If this sounds familiar, this article might help. Once you understand a few simple reasons behind how a finished piece looks, you may feel more confident giving diamond painting another try.
Take a look at the diamond painting you just finished. Look at it closely.
Check the drills first. Do some of them look off? Do you see bubbles inside? Now look at the shape. Do the drills have only a few facets?
If not, try something simple. Use a soft brush and gently clean the surface. Then move it to a place with better light. Take another look. Does it look a bit brighter now?
Still not shiny?
Alright, then it’s time to take a closer look at what might be going on.
The thing is, a diamond painting doesn’t look shiny for just one reason.
At first, I also thought it had to be one problem. Maybe I did something wrong. Maybe the kit wasn’t good. But after doing a few more pieces, I realized it’s usually not that simple.
Even when everything looks fine, small details can still affect the final result. Take a closer look at your piece. Look at how the drills are placed. Are they all in straight lines, or are some a bit off?
You might also notice small gaps if you look carefully. Some drills may catch the light a little differently too. These small things can change how the whole painting looks.
Lighting also makes a big difference. I’ve had pieces that looked dull in one spot, then looked much better when I moved them closer to a window.
So if your painting doesn’t look as shiny as you expected, it’s usually not one big issue. It’s just a few small things adding up.
If your drills are placed neatly and your painting is in a well-lit spot, but it still doesn’t look very shiny, the drills themselves could be the reason.
Not all drills are the same. Some look clear and sharp, while others can look a bit cloudy. If you take a closer look, you might even notice tiny bubbles inside a few of them.
The surface of the drills also plays a big role. What matters here is how many facets they have. Drills with more facets tend to catch light better. Drills with fewer facets usually look a bit flatter when the light hits them.
Material is part of it as well. Resin drills usually have more facets, so they reflect light more easily and tend to look brighter. Acrylic drills often have fewer facets, so they can look a little less shiny in comparison.
That’s why resin drills are often a better choice if you’re aiming for a brighter, more sparkly finish.
When the drills don’t reflect light well, the whole piece can end up looking less shiny. Even if everything is placed neatly, the final result may still feel a bit underwhelming.
If you want to learn more about how diamond painting works and why some pieces don’t look shiny, check out this blog — it goes into detail about the reasons and simple fixes you can try: Why Your Diamond Painting Kits Don’t Sparkle: 4 Key Fixes for Beginners
One more thing that can affect how shiny a diamond painting looks is the shape of the drills.
Square drills fit more tightly together, so there are fewer gaps between them. This helps create a more even surface. When light hits it, the reflection feels more continuous, and the whole piece can look a bit brighter and more sparkly.
Round drills leave small spaces between each drill. These gaps can make the surface look slightly less smooth, so the shine may not feel as strong.
If you’re planning your next project and want a more noticeable sparkle, you might want to try square drills. In many cases, they give a more polished and brighter overall look.
That said, both types have their own look and feel. It really comes down to what you prefer and what kind of result you enjoy working with.
About the Creator
Diamond Painting Lab
Diamond painting insights, techniques, and care tips focused on helping creators better understand materials, methods, and long-term preservation.
Keep reading
More stories from Diamond Painting Lab and writers in Art and other communities.
Watching The End Of The World From The Diner
Introduction I am not sure how to approach this. Guy Peellaert was an amazing artist who created iconic fantasy images of famous people, usually musicians or politicians, as well as creating commissioned album covers such as "It's Only Rock'n'Roll" by The Rolling Stones and David Bowie's "Diamond Dogs" which you can read more about below.
By Mike Singleton 💜 Mikeydred 4 days ago in Art
Dragon Contraption
A husband told his wife one day that he would like to go to space. She told him that is too far and he would have to at least figure out how to get into the air first. He had dreams of finding out the texture of the moon and flying around with the stars.
By Seashell Harpspring 5 days ago in Art


Comments
There are no comments for this story
Be the first to respond and start the conversation.